Vue lecture

Il y a de nouveaux articles disponibles, cliquez pour rafraîchir la page.

How to make instant reports on the Koha home page in an exquisite menu.

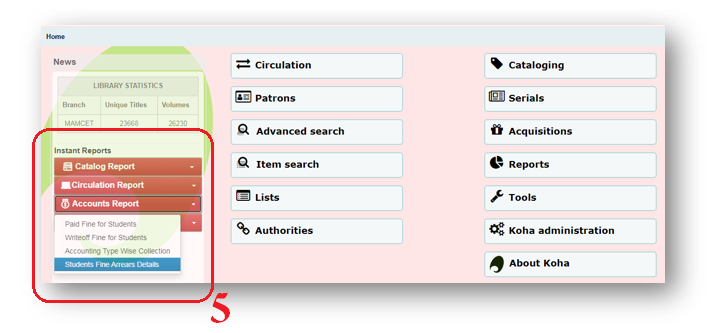
        This article shows how to prepare the reports we need on the koha home page, such as koha circulation reports, catalog reports, account reports, library membership reports and etc as instant reports, with an exquisite menu.

Go to: Koha Home/Tools/HTML customizations and Click  New Entry, as shown in the image below.


Display Location Select for Librarian Interface and fill in all details.


Click the Source Code.


Copy and paste the below source code and change your library reports link, finally change all report links and save the source code.

<div class="dropdown"><button class=" btn btn-danger  btn-sm btn-block" p="" style="font-size: 16px;" type="button" id="dropdownMenuButton" data-toggle="dropdown" aria-haspopup="true" aria-expanded="false"><strong> 📚 Catalog Report&nbsp; &nbsp; &nbsp; &nbsp; &nbsp; &nbsp; &nbsp; &nbsp; &nbsp; &nbsp; &nbsp; &nbsp; </strong><b class="caret"></b></button>
<ol class="dropdown-menu" p="" style="font-size: 14px;">
<li><a href="/cgi-bin/koha/reports/guided_reports.pl?reports=1&amp;phase=Run%20this%20report">Accession Register</a></li>
<li><a href="/cgi-bin/koha/reports/guided_reports.pl?reports=12&amp;phase=Run%20this%20report">Total Number of Books</a></li>
<li><a href="/cgi-bin/koha/reports/guided_reports.pl?reports=33&amp;phase=Run%20this%20report">Department Wise Number of Books</a></li>
<li><a href="/cgi-bin/koha/reports/guided_reports.pl?reports=34&amp;phase=Run%20this%20report">Collection Wise Number of Books</a></li>
<li><a href="/cgi-bin/koha/reports/guided_reports.pl?reports=15&amp;phase=Run%20this%20report">Item Type Wise Number of Books</a></li>
</ol>
</div>
<div class="dropdown"><button class=" btn btn-danger btn-sm btn-block" p="" style="font-size: 16px;" type="button" id="dropdownMenuButton" data-toggle="dropdown" aria-haspopup="true" aria-expanded="false"><strong>💻Circulation Report &nbsp; &nbsp; &nbsp; &nbsp; &nbsp; &nbsp; &nbsp; &nbsp; &nbsp; &nbsp; </strong><b class="caret"></b></button>
<ol class="dropdown-menu" p="" style="font-size: 14px;">
<li><a href="/cgi-bin/koha/reports/guided_reports.pl?reports=13&amp;phase=Run%20this%20report">Check Out List of Books (Date wise)</a></li>
<li><a href="/cgi-bin/koha/reports/guided_reports.pl?reports=7&amp;phase=Run%20this%20report">Check in List of Books (Date wise)</a></li>
<li><a href="/cgi-bin/koha/reports/guided_reports.pl?reports=30&amp;phase=Run%20this%20report">Item Type Wise (Check Out Books)</a></li>
<li><a href="/cgi-bin/koha/reports/guided_reports.pl?reports=24&amp;phase=Run%20this%20report">Circulation Daily Transaction</a></li>
<li><a href="/cgi-bin/koha/reports/guided_reports.pl?reports=44&amp;phase=Run%20this%20report">Date wise Circulation Activity</a></li>
<li><a href="/cgi-bin/koha/reports/guided_reports.pl?reports=20&amp;phase=Run%20this%20report">Month Wise Circulation Report</a></li>
<li><a href="/cgi-bin/koha/reports/guided_reports.pl?reports=9&amp;phase=Run%20this%20report">Overdues Book List</a></li>
</ol>
</div>
<div class="dropdown"><button class=" btn btn-danger btn-sm btn-block" p="" style="font-size: 16px;" type="button" id="dropdownMenuButton" data-toggle="dropdown" aria-haspopup="true" aria-expanded="false"><strong>💰 Accounts Report &nbsp; &nbsp; &nbsp; &nbsp; &nbsp; &nbsp; &nbsp; &nbsp; &nbsp; &nbsp; &nbsp; </strong><b class="caret"></b></button>
<ol class="dropdown-menu" p="" style="font-size: 14px;">
<li><a href="/cgi-bin/koha/reports/guided_reports.pl?reports=5&amp;phase=Run%20this%20report">Paid Fine for Students</a></li>
<li><a href="/cgi-bin/koha/reports/guided_reports.pl?reports=14&amp;phase=Run%20this%20report">Writeoff Fine for Students</a></li>
<li><a href="/cgi-bin/koha/reports/guided_reports.pl?reports=16&amp;phase=Run%20this%20report">Accounting Type Wise Collection</a></li>
<li><a href="/cgi-bin/koha/reports/guided_reports.pl?reports=17&amp;phase=Run%20this%20report">Students Fine Arrears Details</a></li>
</ol>
</div>
<div class="dropdown"><button class=" btn btn-danger btn-sm btn-block" p="" style="font-size: 16px;" type="button" id="dropdownMenuButton" data-toggle="dropdown" aria-haspopup="true" aria-expanded="false"><strong>👩&zwj;🎓 Library Membership Report &nbsp; &nbsp; </strong><b class="caret"></b></button>
<ol class="dropdown-menu" p="" style="font-size: 14px;">
<li><a href="/cgi-bin/koha/reports/guided_reports.pl?reports=11&amp;phase=Run%20this%20report">Membership Staff &amp; Students</a></li>
<li><a href="/cgi-bin/koha/reports/guided_reports.pl?phase=Use%20saved">More Library Reports</a></li>
</ol>
</div>
<div><br /><br /><br /><br /><br /><br /><br /><br /></div>

Go to Koha Home Page and your exquisite instant koha reports menu is ready.


Reference: https://getbootstrap.com/docs/4.0/components/buttons/#sizes 

Date wise circulation transaction report (Koha SQL Reports report in per day circulation activity)

 Date Wise Circulation  Transaction Counts.

         This report is a track the date wise count to total number of  circulation books per day issue, renewal, return and payment breakdown etc.

Crete the New SQL Report.
Copy and Paste following lines in the SQL report. 
Save and close.

SELECT 
date(datetime) AS Date,
      SUM( IF(type = 'issue', 1, 0 )) AS Issues,
      SUM( IF(type = 'renew', 1, 0 )) AS Renewals,
      SUM( IF(type = 'return', 1, 0 )) AS Returns,
      SUM( IF(type = 'payment', 1, 0 )) AS Payment,
      COUNT(statistics.type) AS 'Total Transactions'
FROM  statistics
WHERE DATE(datetime) BETWEEN <<From Date |date>> AND <<To Date |date>>
GROUP BY date

Run Report


Backup and Restore of old Dspace to New Dspace versions.

1. Below are three essential backups to take in dspace.

1.dspace.backup (Database backup)

2.assetstore  (All uploaded files for e.g, pdf, image,etc..)

3 . log  (Configuration files) 

Step - 1

2. Take a backup of Dspace database.

Assume that the old version of Dspace is running. Take a PostgreSQL database backup. 

Open a Terminal and apply following commands, 

sudo su - postgres
pg_dump dspace > dspace.backup

The above command take a backup of Dspace database and store in /var/lib/postgresql/ 

Copy the database backup file to a safe place.

Step - 2

3. Take a backup assetstore and log folders.

Here we are going to backup essential things. All uploaded files stored in assetstore folder.

Save the assetstore and log files to External hard disc. (below red color command your external hard disc storage location)

cd /media/your pc name/External hard disc name
sudo zip -r assetstore.zip /dspace/assetstore
sudo zip -r log.zip /dspace/log

Step - 3

4. Restoration of backup to the latest version of Dspace

  • Install latest Dspace. 
  • Copy the assetstore, log folders, and database.backup to home folder of the system.
  • Extract (unzip) the assetstore and log folders. 
  • Follow the below steps to restore old Dspace backup.

Stop Tomcat server

sudo service tomcat stop

Remove the new dspace assetstore and log folders.

sudo rm -rf /dspace/assetstore
sudo rm -rf /dspace/log/

Move the old dspace assetstore and log folders.

Move your old assetstore and log folders to /dspace folder. (Copy & paste the assetstore and log folder in Home folder)

sudo mv /home/assetstore /dspace
sudo mv /home/log /dspace

Restoration of database

sudo systemctl stop postgresql
sudo systemctl start postgresql

Drop the database and create a new one. 

Apply following commands one by one,
sudo -u postgres psql
DROP DATABASE dspace;
CREATE DATABASE dspace;
\quit

Restore the data base backup

Make sure that the dspace.backup file in home folder. 
Apply the following command one by one to restore the database backup
sudo su postgres
psql -f dspace.backup dspace
exit

Install pgcrypto postgres extension

Execute the following commands one by one,
sudo su postgres
psql --username=postgres dspace -c "CREATE EXTENSION pgcrypto;"
exit

Apply following commands

(Dspace database version check)
sudo /dspace/bin/dspace database info
(Upgrade old database to new database migration)
sudo /dspace/bin/dspace database migrate

(Index Created)

sudo /dspace/bin/dspace index-discovery -b

(All types of files configuration process, for E.g pdf, image, video, audio and etc.. this command long process)

sudo /dspace/bin/dspace filter-media
(Index configuration)
sudo /dspace/bin/dspace index-discovery

 (Index update)

sudo /dspace/bin/dspace index-discovery -o

Restart Tomcat

sudo service tomcat start

Open DSpace in a browser
http://127.0.1.1:8080/jspui

http://127.0.1.1:8080/xmlui


Information courtesy
http://dspacegeek.blogspot.com/2016/06/restore-old-versions-of-dspace-to.html


How to In out Management Auto Backup in Dropbox.

In out Management Auto Backup in Dropbox

In out Management Auto Backup in Dropbox.

Install Dropbox in your koha server 
Create an account in Dropbox 
Open Applications > System Tools > Terminal

Apply the following command,

sudo su
crontab -e 

Use down arrow button and move the cursor to bottom part of the crontab file.
Copy and Paste following command in crontab bottom part.

Backup time 9.00 AM

*/60 * * * * mysqldump -ulibinout -plibinout123 libinout | xz > /home/Dropbox/libinout-$(date +%d-%m-%Y-%H.%M).sql.xz

Apply Ctrl + X, and Y button click Enter to save and close the file.

Wait 15 minute after check in dropbox folder, your backup successfully stored.

In Out Management Problem Solving | Blank Screen After Installation | Logout After 20 Minute Issue

Blank Screen After Installation

Problem :

After installation using any method, When user run this URL (http://localhost/inout/login.php) users are getting blank page in Mozilla Firefox Browser, and Http 500 error in Google Chrome.

Solution:

The problem is with php. It works on php 5.6 so you have to switch php 7 to php 5.6

Execute the following command in terminal.

sudo su

[Enter Password]

sudo a2dismod php8.0

*In above command php8.0 is your active php version. it can be 8.1, 8.2 or 8.3 please make sure this version by entering command php -v.

sudo a2enmod php7.4

sudo service apache2 restart

Logout After 20 Minute Issue

You have to change default session time in php.ini file.
To Open the file.
sudo mousepad /etc/php/7.4/apache2/php.ini
A text editor will open. 
To find variable session.gc_maxlifetime Press Ctrl + F and paste this variable.
It'll find the session.gc_maxlifetime.In front of that the default value is 1440 second that is 24 Minutes.

Change this value to 14400 that is 4 hours.

After changing values Press Ctrl + S It'll save the file. Then exit by Pressing Ctrl + F4.

Hope this will helpful for you.

Thank you.

How to install Koha In Out Management System (E-Gate Entry System koha p...


Download In Out management: https://github.com/omkar2403/inout/releases

Old Inout Management Step by step Installation Notes Click here

Latest In Out management Installation Process.

INSTALLATION OF PHP 7.4

Open terminal and execute commands.

sudo apt-get update
sudo apt -y install software-properties-common
sudo add-apt-repository ppa:ondrej/php
sudo apt-get update
sudo apt -y install php7.4
php -v

Setup the OPAC folder: 

First download the package of the software which contains two mainly files and copy it into Home directory.

Now we have to copy the inout directory into OPAC htdocs directory. 

Open the terminal into Home directory and apply the following commands.

sudo su
sudo mv /home/inout /usr/share/koha/opac/htdocs
cd /usr/share/koha/opac/htdocs
sudo chmod 777 -R inout

Setup the database:
Open the terminal and apply the following commands.

sudo su
mysql -uroot -p
[Enter MySQL Root password]

create database lib;

grant all privileges on lib.* to 'root'@'localhost'identified by'mysqlroot';

flush privileges;

Quit;

Where ‘root’ is the username and ‘mysqlroot’ is the password.

Now restore the sample database which is present in the ‘inout’ directory by applying
following command in terminal (Open Terminal in ‘inout’ directory).

sudo su

mysql -uroot -p lib < lib.sql

[Enter MySQL Root password]

Replace your SQL password and koha database name in the file dbconn.php located in ‘inout/functions/dbconn.php’ directory at the line number 3 & 5.

sudo mousepad /usr/share/koha/opac/htdocs/inout/functions/dbconn.php

Restart Apache

sudo systemctl reload apache2 && sudo systemctl restart apache2

The system is ready now.
You can access it at address given below:

How to use it?
Logins:
There are 3 users for In Out System.

1. Operator (Controls Display Screen / main screen)
username : user
password : 123456

2. Admin of library (Controls Single library / location admin panel and reports)
username : admin
password : library

3. Master ( Controls all the library / location admin panel and reports)
username : master
password : superuser

In out Management Problem Solving,  Blank Screen After Installation and Logout After 20 Minute Issue.

How to In out Management Auto Backup in Dropbox.

Information courtesy: Mr. Omkar Kakeru https://omkar2403.github.io/its_me/


How to Install Dspace-6.3 on Ubuntu MATE 22.04 LTS and Install same server in Koha


Install Ubuntu MATE

Koha officially supports Ubuntu MATE. Download Ubuntu-MATE-20.04.1-desktop(amd64 bit) from the following link,

Burn the Ubuntu MATE ISO image to a Pen Drive/CD/DVD. Insert the medium, change the boot option of the computer and start the installation process of Ubuntu. Visit the link to familiar with the Ubuntu MATE installation.

Open Terminal on your Ubuntu machine for Dspace installation.

sudo apt-get update
sudo apt-get upgrade

Install Git.

sudo apt-get install git

Check git Version. 

git --version

Add git Key. 

sudo add-apt-repository ppa:git-core/ppa

Upgrade git version. 

sudo apt update; apt install git
Install Java. 
sudo apt-get install openjdk-8-jdk

Install Maven. 

sudo apt-get install maven
Install ant. 
sudo apt-get install ant

 Install Postgresql.

Add Postgresql Source file location.

sudo sh -c 'echo "deb http://apt.postgresql.org/pub/repos/apt $(lsb_release -cs)-pgdg main" > /etc/apt/sources.list.d/pgdg.list'

Add Postgresql Key

wget --quiet -O - https://www.postgresql.org/media/keys/ACCC4CF8.asc | sudo apt-key add -
sudo apt-get update

Install Postgresql -9.6 Version

sudo apt-get install postgresql-9.6
sudo su postgres

Create Postgres Username and Password.

createuser --username=postgres --no-superuser --pwprompt dspace
Create Database. 
createdb --username=postgres --owner=dspace --encoding=UNICODE -T template0 dspace
Crypto.
psql --username=postgres dspace -c "CREATE EXTENSION pgcrypto;"
exit

Open the following postgresql, pg_hba.conf file.

sudo gedit /etc/postgresql/9.6/main/pg_hba.conf

Add this below line to the configuration file at the end.

local 	all 		dspace 					md5

Restart PostgreSQL

sudo /etc/init.d/postgresql restart
Create a DSpace User.
sudo useradd -m dspace
sudo passwd dspace
sudo mkdir /dspace
sudo chown dspace /dspace
sudo mkdir /build
sudo chmod -R 777 /build
cd /build

Download the Dspace-6.3 version folder.

wget https://github.com/DSpace/DSpace/releases/download/dspace-6.3/dspace-6.3-src-release.tar.gz

Unzip the download Dspace-6.3 version folder.

tar -zxf dspace-6.3-src-release.tar.gz 

Build the download Dapace-6.3 version folder.

sudo gedit /build/dspace-6.3-src-release/dspace-api/pom.xml

[remove 1.4 plugin]  line number 103 to 105

<plugin>
<groupId>org.codehaus.mojo</groupId>
<artifactId>buildnumber-maven-plugin</artifactId>
<version>1.4</version>
<executions><execution>
<phase>validate</phase>
<goals>
<goal>create</goal >
</goals>
</execution
</executions>
</plugin>

Installation of DSpace-6.3 version.

cd /build/dspace-6.3-src-release
sudo mvn -U package
cd dspace/target/dspace-installer

 Install Apache tomcat-8.5.82

sudo ant fresh_install
cd /opt

Tomcat Download file path Location.

sudo wget https://dlcdn.apache.org/tomcat/tomcat-8/v8.5.83/bin/apache-tomcat-8.5.83.tar.gz

Unzip the download Tomcat folder.

sudo tar xvzf apache-tomcat-8.5.83.tar.gz

Rename folder apache-tomcat-8.5.82” to “tomcat

Move tomcat folder.

sudo mv apache-tomcat-8.5.83 tomcat

Tomcat reading permission. 

sudo rm apache-tomcat-8.5.83.tar.gz

Open the following file. 

sudo gedit /etc/profile

Add following lines at the bottom of the file. 

export JAVA_HOME=/usr/lib/jvm/java-8-openjdk-amd64
export CATALINA_HOME=/opt/tomcat

Dspace and Tomcat file configuration Permission.

sudo cp -r /dspace/webapps/* /opt/tomcat/webapps

Edit the Tomcat init.d  file and Add the Below Scripts. 

sudo gedit /etc/init.d/tomcat

[add this script]

#!/bin/bash
### BEGIN INIT INFO
# Provides: tomcat8
# Required-Start: $network
# Required-Stop: $network
# Default-Start: 2 3 4 5
# Default-Stop : 0 1 6
# Short-Description: Start/Stop Tomcat server
### END INIT INFO

PATH=/sbin:/bin:/usr/sbin:/usr/bin

start() {
sh /opt/tomcat/bin/startup.sh
}

stop() {
sh /opt/tomcat/bin/shutdown.sh
}

case $1 in
start|stop) $1;;
restart) stop; start;;
*) echo "Run as $0 <start|stop|restart>"; exit 1;;
esac

Tomcat permission.

sudo chmod +x /etc/init.d/tomcat
sudo update-rc.d tomcat defaults

Now you can Restart Tomcat.

sudo service tomcat start

Create the Dspace Administrator 

sudo /dspace/bin/dspace create-administrator

It will ask to enter the email address for user login.

Enter Your email Id : dspace@localhost

first & last name : dspace

password & confirm password : dspace

Continue: Yes

Go to any browser copy and paste the link.

http://localhost:8080/jspui


http://localhost:8080/xmlui


I hope this tutorial will help you to install the DSpace in Ubuntu MATE22.4 LTS.

Thank you so much.

Install same server in Koha Latest version 
Visit: https://libpowertech.blogspot.com/2021/03/how-to-install-koha-on-ubuntu-mate-2004.html


Blank screen phpmyadmin page after install or (error apache2.service" and "journalctl -xe")

 If you have any error PHP, use the following method

Blank screen phpmyadmin page after install

After installation phpmyadmin using any method, When user run this URL (http://localhost/phpmyadmin) user are getting blank page in Mozilla Firefox Browser, and Http 500 error in Google Chrome.

It can be 7.4 or below version please make sure this version by entering command php -v.

Execute the following command in terminal.

sudo php - v PHP file location (Version Check) usr/share 

sudo a2dismod php7.4

In above command php7.4 is dis-active in php version. 

sudo a2enmod php8.1

In above command php8.1 is active in php version. 

Restart apache web server.

sudo systemctl restart apache2

Configure Apache web Server file php8.1 version

sudo mousepad /etc/apache2/conf-enabled/phpmyadmin.conf

Below contents to the file: verified your php version.

Alias /phpmyadmin /usr/share/phpmyadmin

<Directory /usr/share/phpmyadmin>
Options SymLinksIfOwnerMatch
DirectoryIndex index.php

<IfModule mod_
php8.c>
<IfModule mod_mime.c>
AddType application/x-httpd-php .php
</IfModule>
<FilesMatch ".+\.php$">
SetHandler application/x-httpd-php
</FilesMatch>

php_value include_path .
php_admin_value upload_tmp_dir /var/lib/phpmyadmin/tmp
php_admin_value open_basedir /usr/share/phpmyadmin/:/etc/phpmyadmin/:/var/lib/phpmyadmin/:/usr/share/php/php-gettext/:/usr/share/php/php-php-gettext/:/usr/share/javascript/:/usr/share/php/tcpdf/:/usr/share/doc/phpmyadmin/:/usr/share/php/phpseclib/
php_admin_value mbstring.func_overload 0
</IfModule>
<IfModule mod_php.c>
<IfModule mod_mime.c>
AddType application/x-httpd-php .php
</IfModule>
<FilesMatch ".+\.php$">
SetHandler application/x-httpd-php
</FilesMatch>

php_value include_path .
php_admin_value upload_tmp_dir /var/lib/phpmyadmin/tmp
php_admin_value open_basedir /usr/share/phpmyadmin/:/etc/phpmyadmin/:/var/lib/phpmyadmin/:/usr/share/php/php-gettext/:/usr/share/php/php-php-gettext/:/usr/share/javascript/:/usr/share/php/tcpdf/:/usr/share/doc/phpmyadmin/:/usr/share/php/phpseclib/
php_admin_value mbstring.func_overload 0
</IfModule>

</Directory>

# Authorize for setup
<Directory /usr/share/phpmyadmin/setup>
<IfModule mod_authz_core.c>
<IfModule mod_authn_file.c>
AuthType Basic
AuthName "phpMyAdmin Setup"
AuthUserFile /etc/phpmyadmin/htpasswd.setup
</IfModule>
Require valid-user
</IfModule>
</Directory>

# Disallow web access to directories that don't need it
<Directory /usr/share/phpmyadmin/templates>
Require all denied
</Directory>
<Directory /usr/share/phpmyadmin/libraries>
Require all denied
</Directory>
<Directory /usr/share/phpmyadmin/setup/lib>
Require all denied
</Directory>

Restart apache web server.

sudo systemctl restart apache2


MSQL Password Error (Access Denied for User 'root'@'localhost' (using password: YES) - No Privileges?)


If you have any error mysql password, use the following method

Follow the Mysql update change

PASSWORD UPDATE (Mysql)

The "unix_socket" has been called by mysql authentication process (maybe related to a partial migration of database to mariadb, now removed). To get all stuff back working go su:
sudo su

then follow:
/etc/init.d/mysql stopmysqld_safe --skip-grant-tables &mysql -uroot

This will completely stop mysql, bypass user authentication (no password needed) and connect to mysql with user "root".
Now, in mysql console, go using mysql administrative db:
Use mysql;
To reset root password to mynewpassword (change it at your wish), just to be sure of it:
update user set password=PASSWORD("mynewpassword") where User='root';
And this one will overwrite authentication method, remove the unix_socket request (and everything else), restoring a normal and working password method:
update user set plugin="mysql_native_password";
Exit mysql console:
quit;

Stop and start everything related to mysql:
/etc/init.d/mysql stop
kill -9 $(pgrep mysql)
/etc/init.d/mysql start
Don't forget to exit the su mode.
Now mySQL server is up and running. You can login it with root:
mysql -u root -p
Enter your Password usage is operative.

That's it.

How to set Instant Reports Options in the Koha Main Page

Step - 1

Go to: Koha Home/Tools/News

Click the New Entry and Select Display location in Librarian interface.
  1. (DD/MM/YYYY)
  2. (DD/MM/YYYY)
    News will still be accessible by direct URL if expired.


Step - 2

Click the Source code


Copy and paste the following HTML Code.

Replace your koha report link in the red colored area. 

All Links in replace and finally save the source code.

<div style="text-align: justify;"></div>
<div style="text-align: justify;">
<table border="0" cellspacing="1" cellpadding="1" style="border-collapse: collapse; width: 280px; height: 90px; margin-left: auto; margin-right: auto;">
<tbody>
<tr style="height: 18px;">
<td style="height: 10px; width: 278px; text-align: center;" colspan="2">
<h3 style="text-align: center;">?? Catalog Report</h3>
</td>
</tr>
<tr style="height: 18px;">
<td style="height: 18px; width: 10px; text-align: center;"><strong>1</strong></td>
<td style="height: 18px; width: 265px;"><strong><a href="/cgi-bin/koha/reports/guided_reports.pl?reports=1&amp;phase=Run%20this%20report" rel="noopener"><span style="color: green;">Accession Register</span></a></strong></td>
</tr>
<tr style="height: 18px;">
<td style="height: 18px; width: 10px; text-align: center;"><strong>2</strong></td>
<td style="height: 18px; width: 265px;"><strong><a href="/cgi-bin/koha/reports/guided_reports.pl?reports=12&amp;phase=Run%20this%20report"><span style="color: green;">Total Number of Books</span></a><br /></strong></td>
</tr>
<tr style="height: 18px;">
<td style="height: 18px; width: 10px; text-align: center;"><strong>3</strong></td>
<td style="height: 18px; width: 265px;"><strong><a href="/cgi-bin/koha/reports/guided_reports.pl?reports=33&amp;phase=Run%20this%20report"><span style="color: green;">Department Wise Number of Books</span></a><br /></strong></td>
</tr>
<tr style="height: 18px;">
<td style="height: 18px; width: 10px; text-align: center;"><strong>4</strong></td>
<td style="height: 18px; width: 265px;"><strong><a href="/cgi-bin/koha/reports/guided_reports.pl?reports=34&amp;phase=Run%20this%20report"><span style="color: green;">Collection Wise Number of Books</span></a><br /></strong></td>
</tr>
<tr style="height: 18px;">
<td style="height: 18px; width: 10px; text-align: center;"><strong>5</strong></td>
<td style="height: 18px; width: 265px;"><strong><a href="/cgi-bin/koha/reports/guided_reports.pl?reports=15&amp;phase=Run%20this%20report" rel="noopener"><span style="color: green;">Item Type Wise Number of Books</span></a><br /></strong></td>
</tr>
</tbody>
</table>
</div>
<div style="text-align: justify;"><br />
<table border="0" cellspacing="1" cellpadding="1" style="border-collapse: collapse; width: 279px; height: 110px; margin-left: auto; margin-right: auto;">
<tbody>
<tr style="height: 18px;">
<td style="height: 18px; width: 275px; text-align: center;" colspan="2">
<h3>?? Circulation Report</h3>
</td>
</tr>
<tr style="height: 18px;">
<td style="height: 18px; width: 9.03125px; text-align: center;"><strong>1</strong></td>
<td style="height: 18px; width: 262.969px;"><strong style="text-align: center;"><a title="Check Out List of Books (Date wise)" href="/cgi-bin/koha/reports/guided_reports.pl?reports=13&amp;phase=Run%20this%20report" rel="noopener"><span style="color: green;">Check Out List of Books (Date wise)</span></a></strong></td>
</tr>
<tr style="height: 18px;">
<td style="height: 18px; width: 9.03125px; text-align: center;"><strong>2</strong></td>
<td style="height: 18px; width: 262.969px;">
<strong style="text-align: center;"><a href="/cgi-bin/koha/reports/guided_reports.pl?reports=7&amp;phase=Run%20this%20report" rel="noopener"><span style="color: green;">Check in List of Books (Date&nbsp;
</span></a></strong>
<strong style="text-align: center;"><a href="/cgi-bin/koha/reports/guided_reports.pl?reports=7&amp;phase=Run%20this%20report" rel="noopener"><span style="color: green;"> wise)</span></a></strong>
<strong style="text-align: center;"><a href="/cgi-bin/koha/reports/guided_reports.pl?reports=7&amp;phase=Run%20this%20report" rel="noopener"><span style="color: green;"></span></a></strong>
<strong style="text-align: center;"><a href="/cgi-bin/koha/reports/guided_reports.pl?reports=7&amp;phase=Run%20this%20report" rel="noopener"><span style="color: green;"><br /></span></a></strong></td>
</tr>
<tr>
<td style="width: 9.03125px; text-align: center;"><strong>3</strong></td>
<td style="width: 262.969px;"><strong style="text-align: center;"><span style="color: green;"><strong style="text-align: center;"><a href="/cgi-bin/koha/reports/guided_reports.pl?reports=30&amp;phase=Run%20this%20report" rel="noopener">Item Type Wise (Check Out Books)</a></strong><br /></span></strong></td>
</tr>
<tr style="height: 18px;">
<td style="height: 18px; width: 9.03125px; text-align: center;"><strong>4</strong></td>
<td style="height: 18px; width: 262.969px;"><span style="color: #e67e23;">
<strong style="text-align: center;"><a href="/cgi-bin/koha/reports/guided_reports.pl?reports=9&amp;phase=Run%20this%20report" rel="noopener" style="color: #e67e23;">Overdues Book List</a></strong></span><strong><br /></strong></td>
</tr>
<tr style="height: 18px;">
<td style="height: 18px; width: 9.03125px; text-align: center;"><strong>5</strong></td>
<td style="height: 18px; width: 262.969px;"><strong style="text-align: center;"><a href="/cgi-bin/koha/reports/guided_reports.pl?reports=24&amp;phase=Run%20this%20report" rel="noopener"><span style="color: green;">Circulation Daily Transaction</span></a></strong><strong><br /></strong></td>
</tr>
<tr style="height: 18px;">
<td style="height: 18px; width: 9.03125px; text-align: center;"><strong>6</strong></td>
<td style="height: 18px; width: 262.969px;"><strong style="text-align: center;"><a href="/cgi-bin/koha/reports/guided_reports.pl?reports=20&amp;phase=Run%20this%20report" rel="noopener"><span style="color: green;">Month Wise Circulation Report</span></a></strong><strong><br /></strong></td>
</tr>
</tbody>
</table>
</div>
<div style="text-align: justify;"><br />
<table border="0" cellspacing="1" cellpadding="1" style="border-collapse: collapse; width: 280px; height: 25px; margin-left: auto; margin-right: auto;">
<tbody>
<tr style="height: 18px;">
<td style="height: 18px; width: 276px; text-align: center;" colspan="2">
<h3 style="text-align: center;">?? Accounts Report</h3>
</td>
</tr>
<tr style="height: 18px;">
<td style="height: 18px; width: 13.7969px; text-align: center;"><strong>1</strong></td>
<td style="width: 259.203px; height: 18px;"><strong><a href="/cgi-bin/koha/reports/guided_reports.pl?reports=5&amp;phase=Run%20this%20report" rel="noopener"><span style="color: green;">Paid Fine for Students</span></a></strong></td>
</tr>
<tr style="height: 18px;">
<td style="height: 18px; width: 13.7969px; text-align: center;"><strong>2</strong></td>
<td style="width: 259.203px; height: 18px;"><strong><a title="Writeoff Fine" href="/cgi-bin/koha/reports/guided_reports.pl?reports=14&amp;phase=Run%20this%20report" rel="noopener"><span style="color: red;">Writeoff Fine for Students</span></a></strong></td>
</tr>
<tr style="height: 18px;">
<td style="height: 18px; width: 13.7969px; text-align: center;"><strong>3</strong></td>
<td style="width: 259.203px; height: 18px;"><strong><a title="A/C Type of Fine" href="/cgi-bin/koha/reports/guided_reports.pl?reports=16&amp;phase=Run%20this%20report" rel="noopener"><span style="color: green;">A/C Type of Fine<br /></span></a></strong></td>
</tr>
<tr style="height: 18px;">
<td style="height: 18px; width: 13.7969px; text-align: center;"><strong>4</strong></td>
<td style="width: 259.203px; height: 18px;"><strong><a title="Fine Details" href="/cgi-bin/koha/reports/guided_reports.pl?reports=17&amp;phase=Run%20this%20report" rel="noopener"><span style="color: green;">Fine Details<br /></span></a></strong></td>
</tr>
</tbody>
</table>
</div>
<div style="text-align: justify;"><br />
<table border="0" cellspacing="1" cellpadding="1" style="border-collapse: collapse; width: 280px; height: 25px; margin-left: auto; margin-right: auto;">
<tbody>
<tr style="height: 18px;">
<td style="height: 18px; width: 276px; text-align: center;" colspan="2">
<h3 style="text-align: center;">??&zwj;??<strong> Library Membership Report</strong></h3>
</td>
</tr>
<tr style="height: 18px;">
<td style="height: 18px; width: 13.7969px; text-align: center;"><strong>1</strong></td>
<td style="width: 259.203px; height: 18px;"><strong> <a title="Membership Staff " href="/cgi-bin/koha/reports/guided_reports.pl?reports=11&amp;phase=Run%20this%20report" rel="noopener"><span style="color: green;">Membership Staff &amp; Students</span></a></strong></td>
</tr>
</tbody>
</table>
</div>
<div style="text-align: justify;"></div>

Step - 3

Go to: Home Page (Successfully Your report displaying)


How to change master password of Koha ?

Koha master login username and password is same as MySQL database (e.g. koha_library), where data stored.

First change the password of koha_library database.

Then put new password in /etc/koha/sites/library/koha-conf.xml

Apply following commands in Applications > Accessories > Terminal

sudo mysql -uroot -p  

[enter the MySQL Root password]

use mysql;

SET PASSWORD FOR 'koha_library'@'localhost' = PASSWORD('mamcet@66');
flush privileges;

quit;

Need to change new password in Koha configuration file.

Open the configuration file using any text editor. Use any text editor, mousepad/leafpad. Install mousepad.

sudo apt-get install mousepad 
sudo mousepad /etc/koha/sites/library/koha-conf.xml 

The file will open. Scroll to bottom part of the file and find the line number 271 for password.

Reference: http://kohageek.blogspot.com/

How to Adding Autocomplete support to MARC21 Catalogue in koha | Book Data Entry page

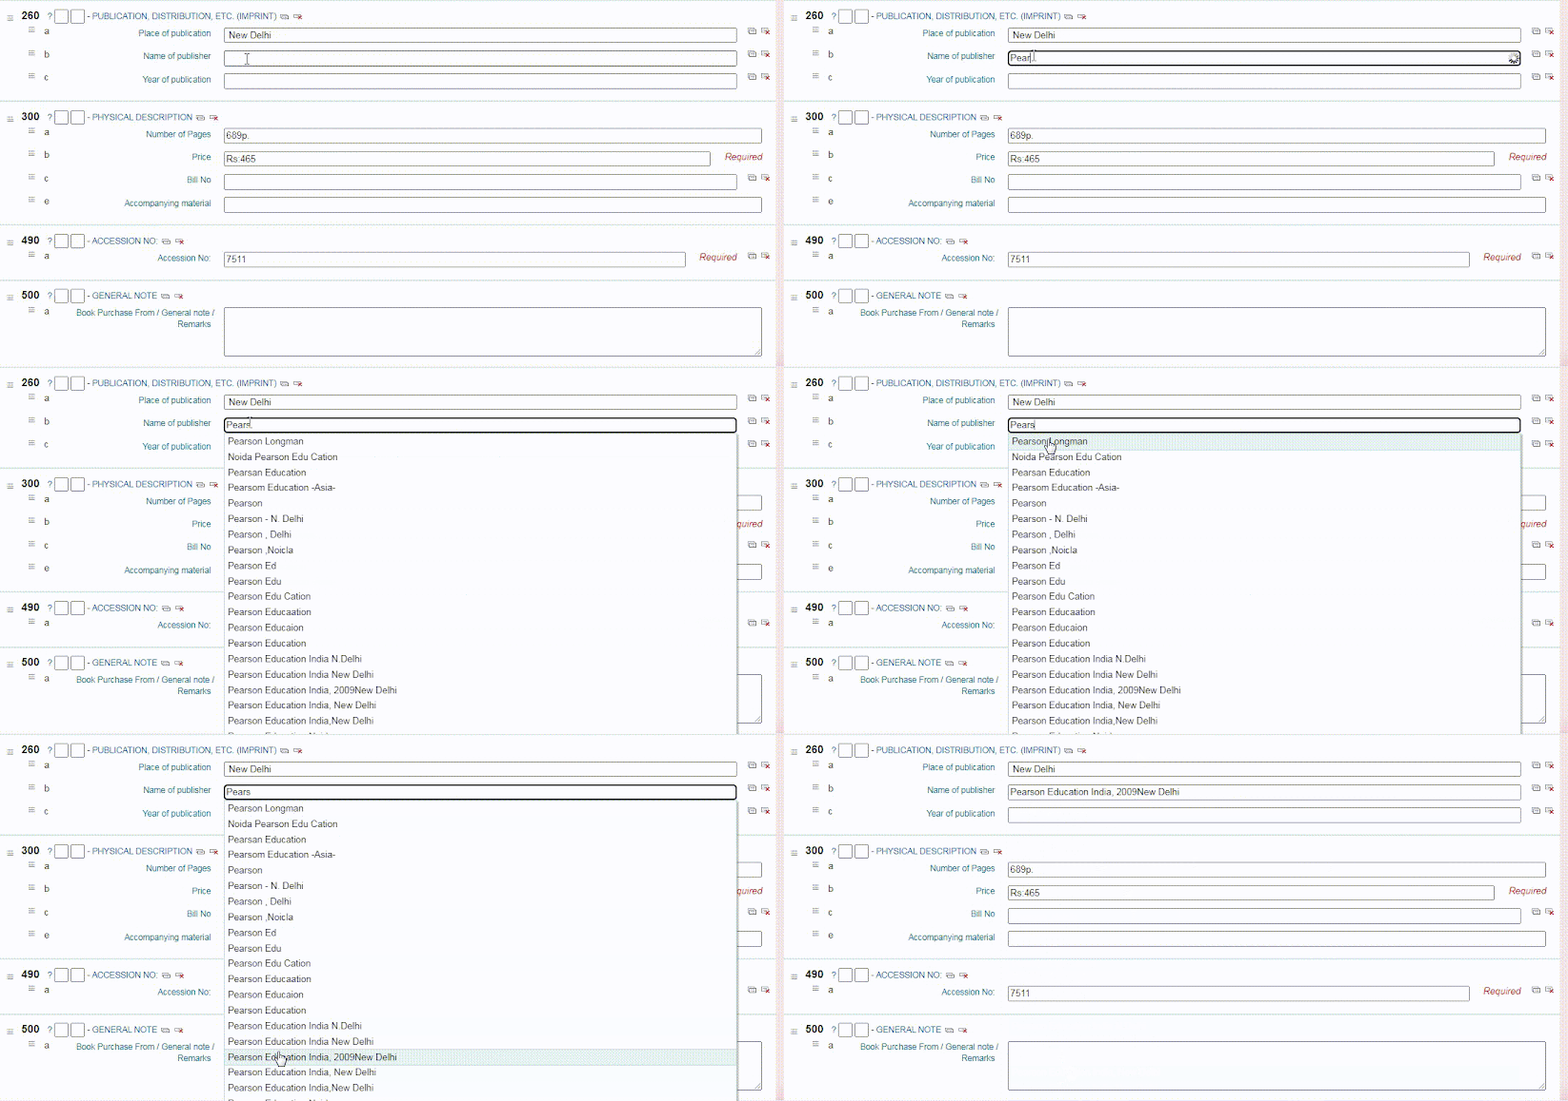
Adding auto-complete feature to Koha’s MARC21 biblioitems field (Imprint – place, name of publisher, ISBN,edition, etc) as a cataloging aid.

Step - 1

Go to : Koha administration/Global system preferences/Staff interface/IntranetUserJS

Below the Java script  enable of the auto completed in four columns for ISBN, Place of publication, Name of the Publisher, Edition

Copy and paste the bellow JS Coding.


//**Autocomplete support to MARC21 catalogue**//  
$(document).ready(function(){
$( '[id^="tag_260_subfield_a"]' ).autocomplete({
    source: function(request, response) {
      $.ajax({
        url: "/cgi-bin/koha/cataloguing/ysearch.pl",
        dataType: "json",
        data: {
          term: request.term,
          table: "biblioitems",
          field: "place"
        },
        success: function(data) {
          response( $.map( data, function( item ) {
            return {
              label: item.fieldvalue,
              value: item.fieldvalue
            };
          }));
        }
      });
    },
    minLength: 1,
  });

 $( '[id^="tag_020_subfield_a"]' ).autocomplete({
    source: function(request, response) {
      $.ajax({
        url: "/cgi-bin/koha/cataloguing/ysearch.pl",
        dataType: "json",
        data: {
          term: request.term,
          table: "biblioitems",
          field: "ISBN"
        },
        success: function(data) {
          response( $.map( data, function( item ) {
            return {
              label: item.fieldvalue,
              value: item.fieldvalue
            };
          }));
        }
      });
    },
    minLength: 1,
  });
  
  $( '[id^="tag_260_subfield_b"]' ).autocomplete({
    source: function(request, response) {
      $.ajax({
        url: "/cgi-bin/koha/cataloguing/ysearch.pl",
        dataType: "json",
        data: {
          term: request.term,
          table: "biblioitems",
          field: "publishercode"
        },
        success: function(data) {
          response( $.map( data, function( item ) {
            return {
              label: item.fieldvalue,
              value: item.fieldvalue
            };
          }));
        }
      });
    },
    minLength: 1,
  });

 $( '[id^="tag_250_subfield_a"]' ).autocomplete({
    source: function(request, response) {
      $.ajax({
        url: "/cgi-bin/koha/cataloguing/ysearch.pl",
        dataType: "json",
        data: {
          term: request.term,
          table: "biblioitems",
          field: "Editionstatement"
        },
        success: function(data) {
          response( $.map( data, function( item ) {
            return {
              label: item.fieldvalue,
              value: item.fieldvalue
            };
          }));
        }
      });
    },
    minLength: 1,
  });
});

Click Save Button.

Step - 2

Go to : Home/Cataloging/New Record (Enter the all bibliographies details )


References:

[1] http://www.loc.gov/catworkshop/RDA%20training%20materials/LC%20RDA%20Training/Module1IntroManifestItemsSept12.doc

[2] https://developer.mozilla.org/en-US/docs/AJAX/Getting_Started

[3] https://gist.github.com/l2c2technologies/7d0449dcb80c90880381ef4571003d1d

[4] http://catb.org/jargon/html/H/hack.html

[5] http://blog.l2c2.co.in/index.php/2017/01/15/adding-autocomplete-support-to-marc21-260-264-imprint-fields-in-koha/

How to Create an Email Receipt Template for Payment in Koha (Online Bill Copy)

It is an HTML5 & CSS payment receipt template that automatically emails receipts for payments made by koha patrons. 

Step - 1

Go to : Tools/Notices & slips/ACCOUNT_PAYMENT ( Edit or  create New notes)

Copy and  paste the bellow HTML5 & CSS Coding. 


<!DOCTYPE html>
<html lang="en">
<head>
    <meta charset="UTF-8">
    <meta name="viewport" content="width=device-width, initial-scale=1.0">
    <title>Lib Power Tech Koha payment Receipt</title>
    <style>
        body{
            background-color: #F6F6F6; 
            margin: 0;
            padding: 0;
        }
        h1,h2,h3,h4,h5,h6{
            margin: 0;
            padding: 0;
        }
        p{
            margin: 0;
            padding: 0;
        }
        .container{
            width: 90%;
            margin-right: auto;
            margin-left: auto;
        }
        .brand-section{
           background-color: #aa1f34;
           padding: 10px 20px;
        }
        .logo{
            width: 50%;
        }

        .row{
            display: flex;
            flex-wrap: wrap;
        }
        .col-6{
            width: 50%;
            flex: 0 0 auto;
        }
        .text-white{
            color: #fff;
        }
        .company-details{
            float: right;
            text-align: right;
        }
        .body-section{
            padding: 16px;
            border: 1px solid gray;
        }
        .heading{
            font-size: 20px;
            margin-bottom: 08px;
        }
        .sub-heading{
            color: #262626;
            margin-bottom: 05px;
        }
        table{
            background-color: #fff;
            width: 80%;
            border-collapse: collapse;
        }
        table thead tr{
            border: 1px solid #111;
            background-color: #f2f2f2;
        }
        table td {
            vertical-align: middle !important;
            text-align: center;
        }
        table th, table td {
            padding-top: 08px;
            padding-bottom: 08px;
        }
        .table-bordered{
            box-shadow: 0px 0px 5px 0.5px gray;
        }
        .table-bordered td, .table-bordered th {
            border: 1px solid #dee2e6;
        }
        .text-right{
            text-align: end;
        }
        .w-20{
            width: 20%;
        }
        .float-right{
            float: right;
        }
    </style>
</head>
<body>

    <div class="container">
        <div class="brand-section">
            <div class="row">
                <div class="col-6">
                    <h1 class="text-white"><img src="https://your college logo image link" alt="Trulli" width="35" height="40">   <<branches.branchname>> </h1>
                </div>
                <div class="col-6">
                    <div class="company-details">
                        <p class="text-white">Your Address - 1</p>
                        <p class="text-white">Your Address - 2</p>
                        <p class="text-white">Your Address - 3</p>
                    </div>
                </div>
            </div>
        </div>

        <div class="body-section">
            <div class="row">
                <div class="col-6">
                    
 <h3>
<p class="sub-heading">Full Name &nbsp; &nbsp; : &nbsp;   <<borrowers.title>>. <<borrowers.surname>></p>
<p class="sub-heading">Roll No &nbsp; &nbsp; &nbsp;&nbsp;&nbsp;&nbsp; : &nbsp; <<borrowers.cardnumber>> </p>
<p class="sub-heading">Department &nbsp; : &nbsp; <<borrowers.borrowernotes>> </p>
<p class="sub-heading">DATE  &nbsp; &nbsp; &nbsp; &nbsp; &nbsp; &nbsp; : &nbsp; [% credit.date %]</p>
<p class="sub-heading">BILL NO  &nbsp; &nbsp; &nbsp; &nbsp; : &nbsp; [% credit.credit_number %] </p>
</h3>   
                </div>
                <div class="col-6">
                    
                   <h2 class="heading">Address:-</h2><b><p>  <<borrowers.address>> <p> 
 <<borrowers.phone>> <p> 
 <<borrowers.email>> </p></b>
                 </div>
            </div>
        </div>

        <div class="body-section"><h1 class="heading"><center><u>RECEIPT</u></center></h1>
            <h3 class="sub-heading">[%- USE Price -%]
[%- USE AuthorisedValues -%]
A payment of Rs. [% credit.amount * -1 | $Price %] via  has been applied to your library account,  payment details below.</h3>
         
            <table class="table-bordered">
                <thead>
                    <tr>
                        <th>Description of charges</th>
                        <th class="w-20">Paid Rs.</th>
                        <th class="w-20">Remaining Rs.</th>
                       
                    </tr>
                </thead>
                <tbody>
                    <tr>
                        <td><p>[%- FOREACH o IN offsets %] [% o.debit.description %] </p></td>
                        <td><p> [% o.amount * -1 | $Price %] </p></td>
                        <td><p> [% o.debit.amountoutstanding | $Price %] </p></td></tr>
<tr>
[% END %] 
</tr>

 <thead><tr>
 <td><p><b><h3>Total</td></p></b></h3>
 <td><p><b><h3>[% credit.amount * -1 | $Price %]</td></p></b></h3>
 <td><p><b><h3>[% o.debit.amountoutstanding | $Price %]</td></p></b></h3>
 </tbody> </table>
            <br>
            <h3 class="heading">Payment Status: Paid</h3>
            <h3 class="heading"> [% IF ( o.credit.note == 'PayPal' ) %] Payment Mode: [% o.credit.note %] [% ELSE%] Payment Mode: [% AuthorisedValues.GetByCode('PAYMENT_TYPE', o.credit.payment_type) %]  [% END %]</h3>
       
       <p>This is computer generated Receipt. No Signature required. Thanking you for payment.</p>
                </div>
        

        <div class="body-section">
            <p>More information visit your account 
                <a href="http://OPAC IP address or domain " class="float-right"><<branches.branchname>> </a>
            </p>
        </div>      
    </div>      

</body>
</html>

Finally Save.

Step - 2

Go to: Fine Payable Patrons Account and Pay the Amount.

Check the patrons Notices option. (Email Status Send or Pending )

Step - 3

If the email status of the patrons notice has been send. Go to your Gmail account and view, have been receipt received successful.


Displaying auto updated unique title and volume count on the Koha staff client or OPAC

Step - 1

 First Create the SQL Public Report 

Go to: Reports/ Create from SQL and (Copy and paste the following SQL query )

SELECT homebranch, count(DISTINCT biblionumber) AS bibs, 
       count(itemnumber) AS items 
FROM items 
GROUP BY homebranch 
ORDER BY homebranch ASC


Save to public report. (Report is public: 


Step - 2

Go to: Koha administration/System preferences/Staff interface/IntranetUserJS

Copy and paste the following JQuery

Replace your IP address and report ID

http://Your koha IP Address/cgi-bin/koha/svc/report?id=36&annotated=1

//**No.of.Book.Dis in home page**//
$("label[for='sql_params_Reselectthesubjecttag']").hide()
 $('#sql_params_Reselectthesubjecttag').hide();
 $("#sql_params_Selectthesubject").change(function() {
   var subval = $('#sql_params_Selectthesubject').val();
   $("#sql_params_Reselectthesubjecttag").val(subval);
 });

$(document).ready(function() {
    if ( $('#main_intranet-main').length ) {
    $.getJSON("http://Your koha IP Address/cgi-bin/koha/svc/report?id=36&annotated=1",
           
        function(data) {
        var branches = data[0].homebranch;
        var bibs = data[0].bibs;
        var items = data[0].items;
        $('div.newsitem').prepend('<div class="newsitem" id="mystats"><table class="table table-striped" style="width: 100%; background: none;"><thead><th colspan="3" style="text-align: center; font-weight: bold; padding: 8px; line-height: 1.42857143; vertical-align: middle; text-transform: uppercase;">Library Statistics</thead><tbody><tr><td><strong>Branch</strong></td><td><strong>Unique Titles</strong></td><td><strong>Total Vols</strong></td></tr><tr><td class="text-center">'+branches+'</td><td class="text-center">'+bibs+'</td><td class="text-center">'+items+'</td></tr></tbody></table></div>');
    });
    }
});


Step - 3

Go to: Home Page (Successfully Your library unique title and volume displaying)


Information courtesy

Installing Multiple Instances of Koha (Koha Multiple Interface /Library)

First install Mousepad (or) Leafpad ( Already installed ignore the command)

Open Terminal and apply the below command (Ctrl + T)

sudo apt-get install mousepad
            (or)
sudo apt-get install leafpad

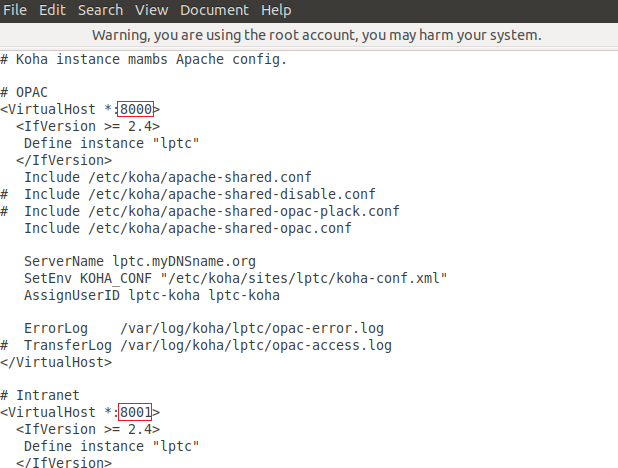
Add two different port numbers for new Koha instance

sudo mousepad /etc/apache2/ports.conf

Add two new ports,

Listen 8000
Listen 8001

Create new instance

sudo koha-create --create-db instancename

We have created an instance (e.g. lptc) for our Lib Power Tech College.

Open and edit apache site file add port numbers

sudo mousepad /etc/apache2/sites-available/lptc.conf

Installing Multiple Instances of Koha

Save and close the file.

Restart Apache server

sudo /etc/init.d/apache2 restart

Open Koha staff client and proceed installation post installation process.

http://127.0.1.1:8001

Zebra rebuild

koha-rebuild-zebra -v -f instancename

Find Koha new instance configuration files in

/etc/koha/sites/ instancename

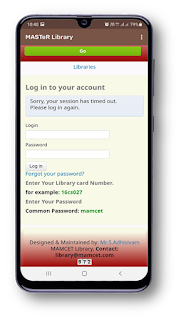
Library Mobile App (Android )

(or)


Scan the QR code and download the Android app.


There are some features of mobile app as listed below:

About App.

  •   Fast and easy to installation 1.16MB Android apk file.

  •   Rotate your phone to view websites in landscape mode.

  •   Single web page design and multiple links pages.

  •   Links to mobile-friendly websites and resources.
App Features.

 App Home Page
  OPAC

 OPAC 2

DELNET
NPTEL
 DSpace
e- Journals
OPAC Login
 Lib Staff Interface


OPAC Features.
  • Patron can search books by Title, Author, Publisher, Subject and Keywords.
  • Search access to the library catalog (Books Bibliography data’s). 
  •  Book Available status and book current location.
  • Department wise no of book available status (Advance search)
  • Access to patron individual accounts (Staff & Students).
  • Book online renewal and reservation.
  • Library new books collection status (New Arrivals)


How to Create Collection wise and Department wise Books in koha


1.Add collections to Authorized Values

Go to Koha > Administration > Authorized Values and select CCODE

Select New authorized value for CCODE button

Add a new Collection Code (For Example English, Tamil, General,etc)


2.Add Department to Authorized Values

Go to Koha > Administration > Authorized Values and select LOC


Select New authorized value for LOC button


Add a new Department Code (For Example CSE, IT, EEE, ECE, CIVIL, MECH, etc)


Add collection or Department to record

Create a catalogue record, Koha > Cataloguing

Add Biblio information (e.g. author, title, publisher, ISBN, etc.)

Save the Biblio information of the catalogue.

The collection code and department code (c - Shelving location) appears in the Item Information part of the catalogue

Generate collection and department wise report

Reports > Create from SQL

Copy and Paste following lines in the SQL report. Save and close.

SELECT location AS 'Department',COUNT(barcode) AS Count FROM items WHERE barcode <> ''
  AND barcode IS NOT NULL GROUP BY ccode
How to create a SQL report : https://youtu.be/scuXS7wVFdM
Run Report

How to Koha Backup Restoration (Restore)

Open Terminal on your Koha System and applying following command.
sudo apt-get update

1. Remove the existing database and Create the new database in the new Koha installation

Login to SQL  database user

sudo mysql -uroot -p

[Enter the your MySQL Root password]

Remove your default database for example koha_library

drop database koha_library;

Create the new existing database (Fro example koha_libpowertech)
create database koha_libpowertech;

quit;

2. Backup Restoration

  • Copy your database backup from your pen drive to koha home folder.
  • Extract the backup file, the extension will be .sql
  • Then restore the old backup to the new Koha installation.

Database Restoration commands,

sudo mysql -uroot -p koha_libpowertech < koha_library.sql

[Enter the your MySQL Root password]

koha_libpowertech - name of database in new installation
koha_library.sql - name of database in old installation


3. Upgrade Database Schema

Database schema of old Koha should upgrade to match with the new version. 

Apply following commands in a terminal one by one,

sudo service memcached restart
sudo koha-upgrade-schema libpowertech

[Your Database Name]


4. Rebuild the Zebra Index.

Apply following command in a terminal,

sudo koha-rebuild-zebra -v -f libpowertech

[Your Database Name]

How to Book Bibliography Data Convert Excel to MARC format

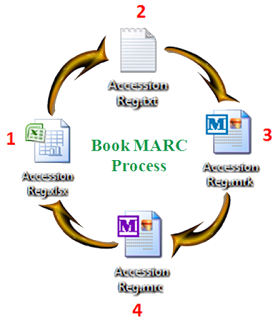
1. Save As the Excel file, to 'Unicode Text (*.txt)' format.
2. Download and install MARCEdit software.
Old Version 
Latest Version
3. Open the MARCEdit Software.
4. Use MARCEdit Click the 'Delimited Text Translator' to convert Text format to MRK format.
5. Use MARCEdit Click the 'MARC ToolsMarcMaker' to convert MRK format to MRC format.

Koha MARC Tag

SL. No

ITEM TYPES

MARC  TAG

1

AUTHOR

100$a

2

TITLE

245$a

3

BARCODE  / ACC  NO

952$p

4

BARCODE SERIES

490$a

5

DDC (Call Number)

082$a & 952$0

6

BILL  NO

300$c

7

PAGE

300$a

8

EDITION

250$a

9

YEAR OF PUBLICATION

260$c

10

PRICE

952$g

11

OPAC PRICE

300$b

12

PUBLISHER

260$b

13

PLACE OF PUBLICATION

260$a

14

SUBJECT

650$a

15

COLLECTION CODE (Type of Collection and Relevant Department)

952$8

16

SHELVING  LOCATION (Department Full Name )

952$c

17

ELECTRONIC  LOCATION (Online book Link)

856&u

18

DATA ACQUIRED (Book Data Entry date)

952$d

19

ISBN

020$a

20

NOTES (Remark / Book Purchase from)

500$a

21

LOST STATUS (Missing  Lost)

952$1

22

ITEM TYPE CODE (Book, CD, Book  Bank)

942$c

23

ITEM TYPE CODE (Reference (or) Transfer)

952$y

24

BRANCH CODE  (Current Location )

952$a

25

BRANCH CODE ( Home Library)

952$b


Book Data Convert to MARC Process


Go to: Tools > Stage MARC records for import

  • You can enter a name for this import. It may be useful, when creating a record, to remember where the suggested MARC data comes from!

Stage records into the reservoir

How to Create Book Barcode and Student's/Saff's ID Card Label Barcode using Glabels Software (Data Download from Koha Software)


GLabels is a free software tool to generate labels/barcodes for various purposes (e.g. Book Barcode, Students/Staffs ID card barcode labels and etc.. )

Install glabels

   1. Open the Terminal (Shortcut: Ctrl + Alt + T)
   2. Type the following command:  sudo apt-get update
   3. Press Enter or Return and type in your password
   4. Type the following command:  sudo apt-get install glabels
   5. Type Y and press Enter or Return

Open Terminal on your Koha System and applying following command.

sudo apt-get install glabels

You can find Glabels in Application > Office > Glabels

Prepare Labels for Barcode/Label creation

Download the Book Barcode template files from here,

Extract them. It contains a Glabels template. Open the Glabels template (Book Barcode 5x13.glabels and User ID Barcode 3x7.glabels) by clicking on the file. 

1.1 Create an book Barcode.

Prepare a list for barcode/label creation

Prepare a Report in Koha to get the list of the barcode (College Name, Call number and Accession number)

Go to : Reports > Create from SQL

Copy and Paste the following SQL

SQL:SELECT items.homebranch,items.itemcallnumber,items.barcodeFROM itemsLEFT JOIN biblioitems ON (items.biblioitemnumber=biblioitems.biblioitemnumber)LEFT JOIN biblio ON (biblioitems.biblionumber=biblio.biblionumber)WHERE cast(items.barcode AS UNSIGNED) BETWEEN <<Accession Number>> AND <<To Accession Number>>ORDER BY items.barcode ASC

Download the Book barcode report in csv format.

1.2 Create an Students/Staffs ID Barcode.

Prepare a Report in Koha to get the list of the barcode (ID Number, Name, Department and designation)

Go to : Reports > Create from SQL

Copy and Paste the following SQL

SQL:SELECT borrowers.cardnumber,borrowers.surname,borrowers.borrowernotes,borrowers.categorycode FROM borrowers WHERE branchcode=<<Enter patrons library|branches>> AND categorycode LIKE <<Select User category|categorycode>>ORDER BY LPAD(borrowers.cardnumber,100,' ') ASC

Download the User Barcode report in csv format.

How to Uninstall gLabels:

   1. Open the Terminal (Shortcut: Ctrl + Alt + T)
   2. Type the following command:   sudo apt-get remove glabel

sudo apt-get remove glabels

How to Change OPAC Header and Footer in Koha 19.11 above Latest versions.

Koha OPAC Customization is very simple process in latest version of Koha 19.11 above.

1.1. Change Banner of Koha OPAC Header:


1. First of all, we will add Banner Image in Header Section.

2. Create a OPAC Banner Image header.png 

3. Copy this image into htdocs folder of koha Server.

4. Put your header image in koha home, and open terminal apply the command.
sudo cp /home/koha/header.png /usr/share/koha/opac/htdocs
(OR)
   
  Free image hosting Uploading your images

Go to:  Tools › News › New entry 

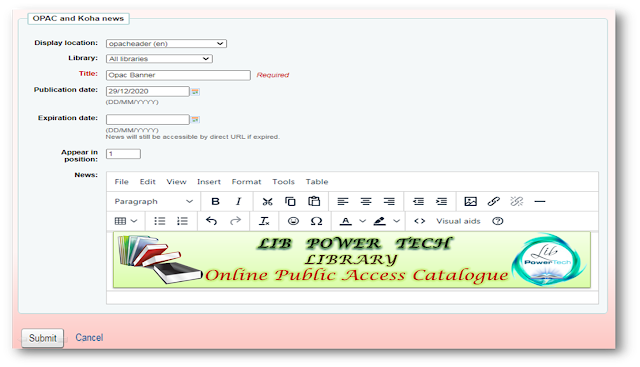
1. Now go to Tools › News Click on New Entry and select opacheader (en)

2. Enter values as showing in below image.

Koha Server Image Path.
<header><img src="/header.png" alt="" width="1230" height="190" /></header>

Private Image Hosting.
<header><img src="https://i.ibb.co/Yprx9fx/header.png" alt="" width="1230" height="190" /></header>

1.2. Change Koha OPAC Footer:

Go to:  Tools › News › New entry 

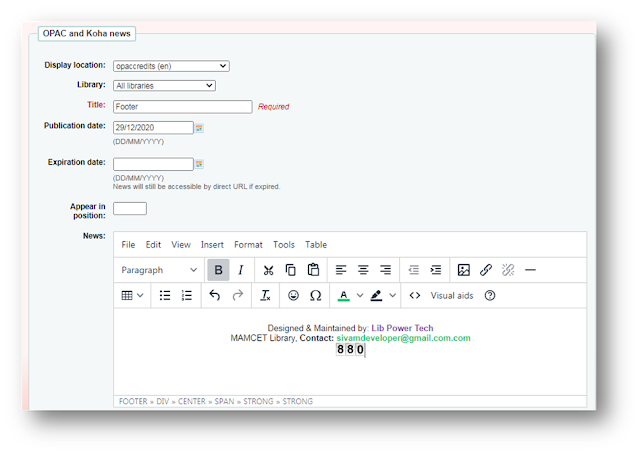
1. Now go to Tools › News Click on New Entry and select opaccredits (en)

2. Enter values as showing in below image.
Copy and Paste the following HTML. (Source Code Section)
<footer>
<div class="container">
<center>
<span style="color: #17202a;">
<br/>Designed &amp; Maintained by:<strong>
<a href="#" target="_blank" rel="noopener">Lib Power Tech</a>
</strong><br/>Central Library, <strong>Contact: <span style="color: #2dc26b;">
sivamdeveloper</span>
<span style="color: #2dc26b;">@gmail.com</span><strong><br/>
<br/></strong></strong></span></center></div>
</footer>

How to Adding OPAC Autocomplete Search Feature in Koha.

OPAC that can be easily implemented auto-completion, would be a great and much wanted feature to have. using the OpacUserJs system preference.

Go to: Koha Administration > Global System Preferences > OPAC > OPACUserJS

Copy and Paste the following Javascript.

/**Autocomplete Search**/
$(document).ready(function(){
$("#translControl1").autocomplete({
        source: function(request, response) {
            $.ajax({
                url: "https://en.wikipedia.org/w/api.php",
                dataType: "jsonp",
                data: {
                    'action': "opensearch",
                    'format': "json",
                    'search': request.term
                },
                success: function(data) {
                    response(data[1]);
                }
            });
        },
        open: function() {
            $('.ui-autocomplete');
       }
    });
});

Reference
Wikipedia : https://en.wikipedia.org/w/api.php
koha-community: https://bugs.koha-community.org/bugzilla3/show_bug.cgi?id=25532#c15

How to Create koha SQL Reports and 15 Library Important Customize Reports...

https://libpowertech.blogspot.com/2019/05/department-wise-number-of-book.html
8. Patrons (Lib Membership List ) by Category wise Report.https://libpowertech.blogspot.com/2019/05/patrons-lib-membership-list-by-category.html 9. Patrons Overdue Number of Days wise and Contact Information.https://libpowertech.blogspot.com/2019/05/patrons-overdue-number-of-days-wise-and.html 10. Circulation Check Out List of Books with in Date wise.https://libpowertech.blogspot.com/2019/05/circulation-check-out-list-of-books.html 11. Circulation Check in List of Books with in Date wise.https://libpowertech.blogspot.com/2019/05/circulation-check-in-list-of-books-with.html12. All Checked Out Books in your Library.https://libpowertech.blogspot.com/2019/05/all-checked-out-books-in-your-library.html 13. Fine Paid for Library Patrons.https://libpowertech.blogspot.com/2019/05/fine-paid-for-library-patrons-sql.html 14. New Books Entry in Date wise List of Books.https://libpowertech.blogspot.com/2019/05/new-books-entry-in-date-wise-list-of.html 15. Customize koha Accession Register.https://libpowertech.blogspot.com/2019/05/accession-register.html

Customize koha Accession Register (Koha SQL Reports Queries)


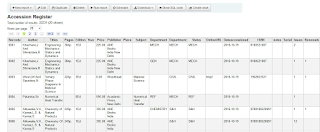
Accession Register Customize
  • Crete the New SQL Report
  • Copy and Paste  following lines in the SQL report. Save and close.

SELECT items.Barcode,biblioitems.biblionumber,items.itemcallnumber AS 'Call Number',biblio.Author,biblio.Title AS Titles,biblioitems.size As 'Bill No', biblioitems.Pages, biblioitems.Editionstatement AS Edition,biblio.Copyrightdate AS Year,items.Price,biblioitems.illus AS 'OPAC Price',biblioitems.publishercode AS Publisher,biblioitems.Place AS 'Place of Publication',biblio.unititle AS Subject,items.ccode AS Collection,items.location AS 'Department Wise', items.itype AS 'Book Status / Item type',biblioitems.itemtype AS Department,biblioitems.url AS OnlineURL,items.Dateaccessioned,biblioitems.ISBN,biblio.notes As ' General Notes/Remarks',biblio.Serial,items.Issues,items.Renewals
FROM items 
LEFT JOIN biblioitems ON (items.biblioitemumber=biblioitems.biblioitemnumber)
LEFT JOIN biblio ON (biblioitems.biblionumber=biblnio.biblionumber)
ORDER BY LPAD(items.barcode,40,' ') ASC

Run Report


How to Install Koha on Ubuntu MATE 22.04 LTS | Install Koha on Latest Stable Version (with very easy steps)


Install Ubuntu MATE

Koha officially supports Ubuntu MATE. Download Ubuntu-MATE-20.04.1-desktop(amd64 bit) from the following link,

Burn the Ubuntu MATE ISO image to a Pen Drive/CD/DVD. Insert the medium, change the boot option of the computer and start the installation process of Ubuntu. Visit the link to familiar with the Ubuntu MATE installation.

Open Terminal on your Ubuntu machine for Koha installation.

sudo su

apt-get update

apt-get upgrade

Install mousepad Text Editor

apt-get install mousepad

Add Koha repository

sudo apt install -y software-properties-common dirmngr file-roller 

Add Koha Community Repository & Trusted Repository Key

echo 'deb http://debian.koha-community.org/koha oldstable main' | sudo tee /etc/apt/sources.list.d/koha.list

wget -O- http://debian.koha-community.org/koha/gpg.asc | sudo apt-key add -

Update Software Repository

apt-get update

Install Koha Software

sudo apt install -y koha-common

Port Configuration

Open following file to change port number.

sudo mousepad /etc/koha/koha-sites.conf

Here I change the port number of the Koha staff client to 8080. Find the following line in the file and make changes.

INTRAPORT="8080"

Install MariaDB Client & Server

We will use MariaDB Client and Server for Koha Database. Execute following commands one by one to
 
Install MariaDB Client .

sudo apt install mariadb-client-10.3

Install MariaDB Server.

sudo apt install mariadb-server

Assign Root password for MariaDB

sudo mysqladmin -u root password newpass

[Replace 'newpass']

Koha instance creation

Apply the following commands to create Apache configuration files.

sudo a2enmod rewrite

sudo a2enmod cgi

sudo service apache2 restart

Create a Koha instance with the name library. (Your Library Short Name)

sudo koha-create --create-db library

Add new port

We have assigned 8080 port for the Koha staff client and 80 for OPAC.  Open the following file and add the new port, 8080 to Apache.

sudo mousepad /etc/apache2/ports.conf

Copy-paste following line below Listen 80
Listen 8080

Restart Apache,

sudo service apache2 restart

Enable modules and sites

sudo a2dissite 000-default

sudo a2enmod deflate

sudo a2ensite library

sudo service apache2 restart

Run the following command to install “Locale::Language” perl module.

sudo apt install liblocale-codes-perl

Enable & Start Plack for Koha Performance Improvement (Only enable it if you have sufficient RAM):

sudo koha-plack --enable library && sudo koha-plack --start library

Install perl modules koha Supporting

sudo perl -MCPAN -e 'install Bundle::KohaSupport'


Restart Memcached service to open Koha web installer.

sudo service memcached restart

Open the following link in the web browser to open the staff client of Koha and set up the library,

Staff Client
http://127.0.1.1:8080
OPAC
http://127.0.1.1
  

Enter into the Koha staff client using the Database username and password of koha_libraryIt can find from the file, /etc/koha/sites/library/koha-conf.xml. 

Apply the following file in a terminal.

sudo mousepad /etc/koha/sites/library/koha-conf.xml

Multiple Instances library  

Open and edit apache2 site file add port numbers
sudo mousepad /etc/apache2/sites-available/library.conf

Setup the library

After the successful installation, need to create initial parameters Visit links (e.g. 

1.Branch,

2.Itemtype,

3.Superuser Creation or super Librarian ,

4.Circulation rules,

7.Adding a New Books etc...) to start with Koha. We need to open the web interface of Koha and start the configuration of Koha to start.

Reference

Koha on Ubuntu - packages
https://wiki.koha-community.org/wiki/Koha_on_ubuntu_packages
Koha Geek: http://kohageek.blogspot.com/

How to Set and Send Customize Email Notices from Koha

Koha has the option to send email notices to users in various occasions like New Membership, Check-out, Check-in, Renewal, Reminder Overdue, and fine, etc. Sample notices are available with Koha. Library staff can customize the subject line and content of the emails.


Sample messages can be find at Tools > Notices&Slips 


Let see how can we customize a notice send from Koha.

1. New Membership.


Go to: Tools > Notics & Slips / ACCTDETAILS ( Click Edit)

Copy and Paste the following HTML Lines.
<p><font face="Josefin Slab"></p>
Hello <br>          
          <<borrowers.title>> <<borrowers.firstname>> <<borrowers.surname>><br>  Library Card No: <<borrowers.cardnumber>><br>
          Department of: <<borrowers.borrowernotes>>,<br>
          <<borrowers.address>>.<br>
          <<borrowers.email>>,<br> <<borrowers.phone>><br>
Your Library Card Ready Please Collected to <<branches.branchname>>.<br><br>
 
Your New <<branches.branchname>> Membership Account Details are<br>
User ID    :<b><<borrowers.userid>><br></b>
Password: <b><<borrowers.password>></b><br>
Please Visit Your Account Details <a href="/cgi-bin/koha/opac-main.pl?logout.x=1" target="_blank">Click here<img src="https://4.bp.blogspot.com/-IwJHtzYqSKo/V6XBL0tZESI/AAAAAAAAAbg/rVqNyWSn2cY21ZezUGiKrrByUxAqjuXzQCPcB/w1200-h630-p-nu/look-here.gif" alt="Smiley face" width="50" height="42"></img></a><br>
<b><u>LIBRARY RULES AND REGULATIONS</b></u>
<ul><p style="text-align:justify">
    1. Open Access System is followed in the Library.<br>
    2. Strict and absolute silence shall be observed in the library.<br>
    3. Mobile phone to be switched off inside the Library.<br>
 
<p><b>This is an Automatically Generated Email.</b> <p>
If you have any problems or questions regarding your account, please contact your <<branches.branchname>>.<br><br>
Thank you...<br>
Librarian,<br>
<<branches.branchname>>,<br></font>


2.Check-out


Go to: Tools > Notics & Slips / CHECKOUT ( Click Edit)

Copy and Paste the following HTML Lines.

.

Dear <br>        <<borrowers.title>>.<<borrowers.surname>><br>
<p>The following items have been<b> Issues:</b></p>
<table style="width: auto; height: 45px;" border="2" TABLE BORDERCOLOR="black"   cellspacing="2" cellpadding="1">
<tr>
    <td><strong>Library Card No</td></strong>
    <td><<borrowers.cardnumber>></td>  
  </tr>
  <tr>
    <td><b>Name of the Member</td>
    <td><<borrowers.surname>></td>
  </tr>
  <tr>   
    <td><b>Barcode / Acc No</td>
    <td><<items.barcode>></td>
  </tr>
  <tr>    
    <td><b>Title</td>
    <td><<biblio.title>></td>
  </tr>
  <tr>    
    <td><b>Author</td>
    <td><<biblio.author>></td>
     </tr>
  <tr>    
    <td><b>Book Issue Date</td>
    <td><<issues.issuedate>></td>
  </tr>
  <tr>    
    <td><b>Book Due Date</td>
    <td><<issues.date_due>></td>
  </tr> 
 </h2> </tr>
</table>
<b><p>Visit your account details. <a href="/cgi-bin/koha/opac-main.pl?logout.x=1" target="_blank">Click here<img src="https://4.bp.blogspot.com/-IwJHtzYqSKo/V6XBL0tZESI/AAAAAAAAAbg/rVqNyWSn2cY21ZezUGiKrrByUxAqjuXzQCPcB/w1200-h630-p-nu/look-here.gif" alt="Smiley face" width="50" height="42"></img></a></p></b>
<p><b>User Name:</b> <<borrowers.userid>></p></b>
<p><b>Password:</b> mamcet</p></b>

<br><p><b>This is an Automatically Generated Email.</b></br><br>

Thank you for visiting <a href="/cgi-bin/koha/opac-main.pl?logout.x=1" target="_blank"> <<branches.branchname>>.</a>

3.Check-In


Go to: Tools > Notics & Slips / CHECKIN ( Click Edit)

Copy and Paste the following HTML Lines.

.

Dear <br>         <<borrowers.title>>. <<borrowers.surname>><br>

The following items have been<b><font color="green"> Return:</b><br></font color>
<table style="width: auto; height: 45px;" border="2" TABLE BORDERCOLOR="green"   cellspacing="2" cellpadding="1">
  <tr>
    <td><b>Lib No</td></b>
    <td><<borrowers.cardnumber>></td>
  </tr>
  <tr>
    <td><b>Name of the Member</td></b>
    <td><<borrowers.surname>></td>
  </tr>
  <tr>
    <td><b>Barcode / Acc No</td></b>
    <td><<items.barcode>></td>
  
  </tr>
  <tr>
    <td><b>Book Title</td></b>
    <td><<biblio.title>></td>
  </tr>
 <tr>
    <td><b>Author</td></b>
    <td><<biblio.author>></td>

  </tr>
 <tr>
    <td><b>Date of Return</td></b>
    <td><<old_issues.returndate>></td>

  </tr>
</table>
<b><p>Visit your account details. <a href="/cgi-bin/koha/opac-main.pl?logout.x=1" target="_blank">Click here<img src="https://4.bp.blogspot.com/-IwJHtzYqSKo/V6XBL0tZESI/AAAAAAAAAbg/rVqNyWSn2cY21ZezUGiKrrByUxAqjuXzQCPcB/w1200-h630-p-nu/look-here.gif" alt="Smiley face" width="50" height="42"></img></a></p></b>
<p><b>User Name:</b> <<borrowers.userid>></p></b>
<p><b>Password:</b> mamcet</p></b>
<p><b>This is an Automatically Generated Email.</b> 

Thank you for visiting <a href="/cgi-bin/koha/opac-main.pl?logout.x=1" target="_blank"> <<branches.branchname>>.</a></br>

4.Renewal


Go to: Tools > Notics & Slips / RENEWAL ( Click Edit)

Copy and Paste the following HTML Lines.

<br> Dear <br>      <<borrowers.title>>.   <<borrowers.surname>><br>

The following items have been<b><font color="orange"> Renewal:</b><br></font color>
<table style="width: auto; height: 45px;" border="2" TABLE BORDERCOLOR="#FF9900"   cellspacing="2" cellpadding="1">

  <tr>
    <td><b>Lib No</td></b>
    <td><<borrowers.cardnumber>></td>
  </tr>
  <tr>
    <td><b>Name of the Member</td></b>
    <td><<borrowers.surname>></td>
  </tr>
  <tr>
    <td><b>Barcode</td></b>
    <td><<items.barcode>></td>
  
  </tr>
  <tr>
    <td><b>Book Title</td></b>
    <td><<biblio.title>></td>
  </tr>
 <tr>
    <td><b>Author</td></b>
    <td><<biblio.author>></td>

  </tr>
 <tr>
    <td><b>Book Issue Date</td></b>
    <td><<issues.issuedate>></td>
  </tr>
 <tr>
  <td><b>Last Renewal Date</td></b>
    <td><<issues.lastreneweddate>></td>
  </tr>
 <tr>
    <td><b>Book Due Date</td></b>
    <td><<issues.date_due>></td>
  </tr>
 <tr>
   <td><b>No. of.  Renewals</td></b>
    <td><<issues.renewals>></td>
</table>
<b><p>Your account  details <a href="/cgi-bin/koha/opac-main.pl?logout.x=1" target="_blank">Click here<img src="https://4.bp.blogspot.com/-IwJHtzYqSKo/V6XBL0tZESI/AAAAAAAAAbg/rVqNyWSn2cY21ZezUGiKrrByUxAqjuXzQCPcB/w1200-h630-p-nu/look-here.gif" alt="Click" width="50" height="42"></img></a></p></b>
<p><b>User Name:</b> <<borrowers.userid>></p></b>
<p><b>Password:</b> <<borrowers.password>></p></b><br>

<p><b>This is an Automatically Generated Email.</b>

<p>Thank you for visiting<p>
<a href="/cgi-bin/koha/opac-main.pl?logout.x=1" target="_blank"> <font size="3"> <<branches.branchname>> </font></a></br>

4.Reminder Overdue, and Fine.


Go to: Tools > Notics & Slips / ODUE ( Click Edit)

Copy and Paste the following HTML Lines.

<p><font face="verdana"style="text-align:justify"font size="3">

Dear       
<br>          <<borrowers.title>>. <<borrowers.firstname>> <<borrowers.surname>>,

<p>       According to our current records, you have items that are overdue. Your library does not charge late fines, but please return or renew them at the branch below as soon as possible.</p>

<p>      If you have registered a password with the library, and you have a renewal available, you may renew accessible to the PCs in the campus through LAN. <a href="/cgi-bin/koha/opac-main.pl?logout.x=1" target="_blank">OPAC</a> If an item becomes more than 15 & 30* days overdue, you will be unable to use your library card until the item is returned.</p>


<p>The following item(s) is are currently overdue:<p>
<item><br>
<strong>Title:</strong> <<biblio.title>><br>
<strong>Author:</strong> <<biblio.author>> <br>
<strong>Barcode:</strong> <<items.barcode>> <br>
<strong>Book Due Date:</strong> <<issues.date_due>><br>
<strong>Fine amount: Rs:</strong><font color="red"> <<items.fine>><<accountlines.Amount>></font color></item><br>

<b><p><font color="green">Visit your account details. <a href="/cgi-bin/koha/opac-main.pl?logout.x=1" target="_blank">Click here<img src="https://4.bp.blogspot.com/-IwJHtzYqSKo/V6XBL0tZESI/AAAAAAAAAbg/rVqNyWSn2cY21ZezUGiKrrByUxAqjuXzQCPcB/w1200-h630-p-nu/look-here.gif" alt="Smiley face" width="50" height="42"></img></a></p>
<p>User Name: <<borrowers.userid>></p>
<p>Password: mamcet</p></font color></b>
<font face="verdana"style="text-align:justify"font size="3">
<p><b>This is an Automatically Generated Email.</b> <p>
<p>Thank-you for your prompt attention to this matter.<p></p>

<<branches.branchname>> 
</font></p>


How to Configure gmail with postfix to send notices from Koha 20.5 (check in, check out and etc )

1. Installation of postfix mail server

Open a terminal and apply the following commands one by one,

sudo apt-get update
sudo apt-get install postfix
Postfix Configuration ( OK )
No Configuration ( Select and OK)


2. Copy the configuration file.

sudo cp /usr/share/postfix/main.cf.debian /etc/postfix/main.cf

3. Install following packages too

sudo apt-get install libsasl2-2
sudo apt-get install libsasl2-modules
sudo apt-get install ca-certificates

4. Open the following file and add few lines.

sudo leafpad /etc/postfix/main.cf


Add the following lines at the bottom of the file.

relayhost = [smtp.gmail.com]:587
smtp_sasl_auth_enable = yes
smtp_sasl_password_maps = hash:/etc/postfix/sasl_passwd
smtp_sasl_security_options = noanonymous
smtp_tls_CAfile = /etc/postfix/cacert.pem
smtp_use_tls = yes

5.Open the following file.

sudo leafpad /etc/postfix/sasl_passwd

Add the following line in the opened file.

[smtp.gmail.com]:587    urgmailid@gmail.com:yourpassword

Add your Gmail username and password.

6. Change the permission of the following file.

sudo chmod 400 /etc/postfix/sasl_passwd
sudo postmap /etc/postfix/sasl_passwd
sudo postalias hash:/etc/aliases

7.Create the /etc/postfix/cacert.pem. ( Ubuntu 18.04 LTS Users)

sudo cat /etc/ssl/certs/thawte_Primary_Root_CA.pem >> /etc/postfix/cacert.pem

For Ubuntu 20.04 LTS Users

sudo cat /etc/ssl/certs/Actalis_Authentication_Root_CA.pem >> /etc/postfix/cacert.pem

8.  Restart Postfix.

sudo /etc/init.d/postfix restart

9. Enable email service in Koha

sudo koha-email-enable library

10. Check the following settings in Koha to send email notices,
Koha > Administration > Patron categories > Overdue notice required > Yes


Koha Administration > Global System Preferences > Patrons > Enhancedmessagingpreferences > Allow


Information courtesy

Vimal : http://kohageek.blogspot.com/

Vinod Kumar : https://eureka.ykyuen.info/2011/02/05/postfix-relay-via-gmail/#comment-10597

How to Installation of koha Live DVD

 1. Insert DVD and restart PC.

2. Change the boot option to DVD.

3. Live DVD will directly go to Live mode. Ubuntu desktop will load.

4. Open Applications > System Tools > Terminal, and apply following commands,

sudo su

Password:

koha123
ubiquity

The installer window will appear.

Proceed with the installation.

Koha 17.05.09 Live DVD Download


Information courtesy

Vimal : http://kohageek.blogspot.com/

How to Change Koha Staff Client Background Color or Image

Go to Koha Staff Client
Administration ›Global System preferences › Staff Client › IntranetUserCSS

Copy and paste the following CSS code.

Color BG
1
2
3
body {
background: linear-gradient(to bottom,#E7FAF9 65%,#6BF3EB 100%);
}

Image BG
1
2
3

body {

background:url("https://static-cse.canva.com/blob/142529/Image-by-Stanislav-Kondratiev-via-Unsplash.c74e94c2.jpg");

}
Save all staff client preferences
Refresh your page.

More then HTML Colors Code visit: https://htmlcolorcodes.com/


How To Change Koha MySQL Database User Password


            After installing Koha Live CD, MySQL server, we can make connection with the server as a root user by default password(mysqlroot). For security purpose, sometimes we need to change the password for root or any existing user.

In this tutorial, you will learn how you can change the password of any existing MySQL user on Ubuntu.

Open Terminal (Ctrl + T)
Using the following command.
sudo su
Enter your system super user password

mysql -u root -p
To change the password of root user on local server, you have to run the following SQL command. Here, ‘mynewpassword’ is set as new password.
UPDATE mysql.user SET Password=PASSWORD('mynewpassword') WHERE USER='root';
quit;
Again, exit from the server and restart the database server before testing the new password.
sudo service mysql restart
Now, check the new password is working or not for root user.
mysql -u root -p
By following any of the above SQL statements, you can easily change the password of any existing MySQL user.


Department wise, Collection wise and Item Type wise Number of Books in Your Library (Koha SQL Reports Queries)


Department wise, Itemtype  wise and Collection wise Number of Books.
  • Crete the New SQL Report
  • Copy and Paste  following lines in the SQL report. Save and close.
Report-1
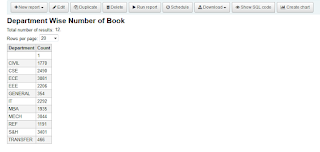
Department Wise Number of Books.
SELECT location AS 'Department',COUNT(barcode) AS Count FROM items WHERE barcode <> ''
  AND barcode IS NOT NULL GROUP BY location

Report-2
Item Type Wise Number of Books.
SELECT itype AS 'Department',COUNT(barcode) AS Count FROM items WHERE barcode <> ''  
  AND barcode IS NOT NULL GROUP BY itype

Report-3
Collection Wise Number of Books.
SELECT
    av.lib AS  "Collection ",
    COUNT( i.barcode ) AS  "Count"
FROM items i
LEFT JOIN authorised_values av ON ( av.authorised_value = i.ccode ) 
    AND av.category =  'CCODE'
WHERE i.ccode IS NOT NULL
GROUP BY i.ccode


Run Report

How to Change Color in All Text box and Input Border Style from Koha.


Text box border style change from koha , for example the barcode field on the checkout, check-in , and etc..

1. Open a Terminal and apply following command. (Ctrl + Alt = T)

sudo su( Enter your Password)

sudo leafpad /usr/share/koha/intranet/htdocs/intranet-tmpl/prog/css/staff-global.css


2. Find the following coding. Find (Ctrl + F) 

This lets us see that there is a CSS rule defining a default border style for koha.

1
2
3
4
5
input:focus, textarea:focus {
border-color: #538200;
border-radius: 4px;
border-style: solid;
}

Remove the default border style CSS code.

3. Copy and paste the following customized textbox style CSS code:

1
2
3
4
5
6
7
8
9
10
11
12
13
14
15
16
17
18
input:focus {
border-top: 5px solid #86B300;
border-bottom: 5px solid #CCFF33;
background-image: -webkit-gradient(linear, 0 0, 0 100%, from(#86B300), to(#CCFF33));
background-image: -webkit-linear-gradient(#86B300, #CCFF33);
background-image: -moz-linear-gradient(#86B300, #CCFF33),
-moz-linear-gradient(#86B300, #CCFF33);
background-image: -o-linear-gradient(#86B300, #CCFF33),
-o-linear-gradient(#86B300, #CCFF33);
background-image: linear-gradient(#86B300, #CCFF33),
linear-gradient(#86B300, #CCFF33);
-moz-background-size:5px 100%;
background-size:5px 100%;
background-position:0 0, 100% 0;
background-repeat:no-repeat;
border-width: 5px 0;
padding: 5px;
}

4. Finally your koha text box has been changed successfully.

Information courtesy:

❌