<div style="text-align: justify;"></div>
<div style="text-align: justify;">
<table border="0" cellspacing="1" cellpadding="1" style="border-collapse: collapse; width: 280px; height: 90px; margin-left: auto; margin-right: auto;">
<tbody>
<tr style="height: 18px;">
<td style="height: 10px; width: 278px; text-align: center;" colspan="2">
<h3 style="text-align: center;">?? Catalog Report</h3>
</td>
</tr>
<tr style="height: 18px;">
<td style="height: 18px; width: 10px; text-align: center;"><strong>1</strong></td>
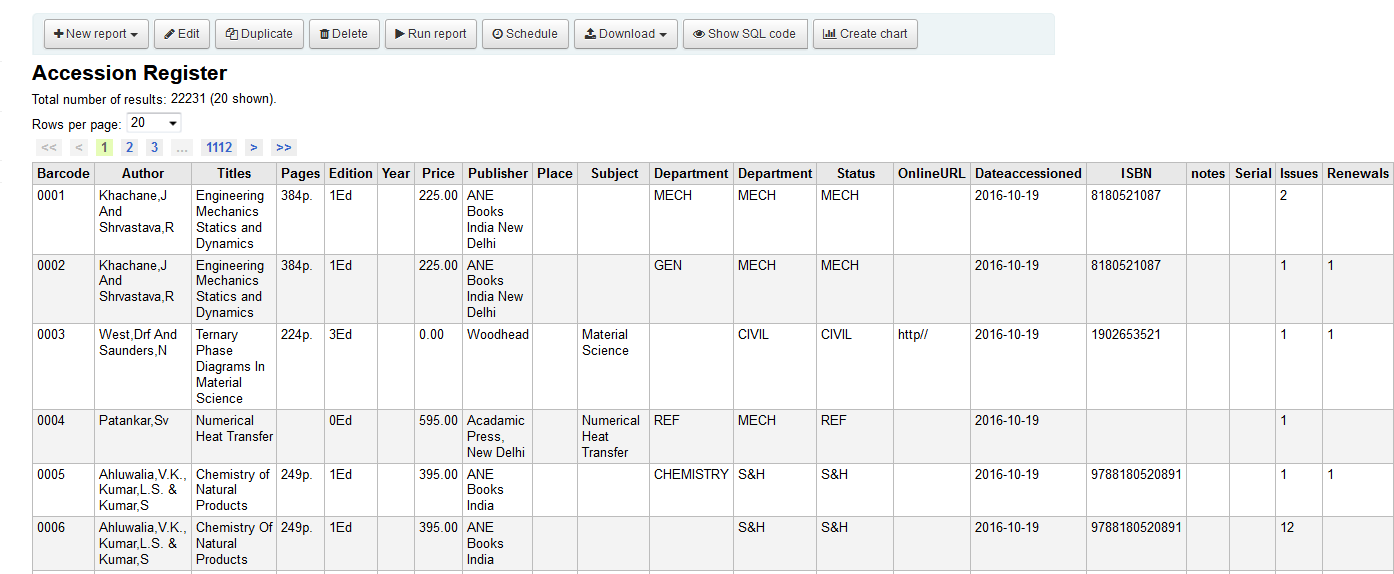
<td style="height: 18px; width: 265px;"><strong><a href="/cgi-bin/koha/reports/guided_reports.pl?reports=1&phase=Run%20this%20report" rel="noopener"><span style="color: green;">Accession Register</span></a></strong></td>
</tr>
<tr style="height: 18px;">
<td style="height: 18px; width: 10px; text-align: center;"><strong>2</strong></td>
<td style="height: 18px; width: 265px;"><strong><a href="/cgi-bin/koha/reports/guided_reports.pl?reports=12&phase=Run%20this%20report"><span style="color: green;">Total Number of Books</span></a><br /></strong></td>
</tr>
<tr style="height: 18px;">
<td style="height: 18px; width: 10px; text-align: center;"><strong>3</strong></td>
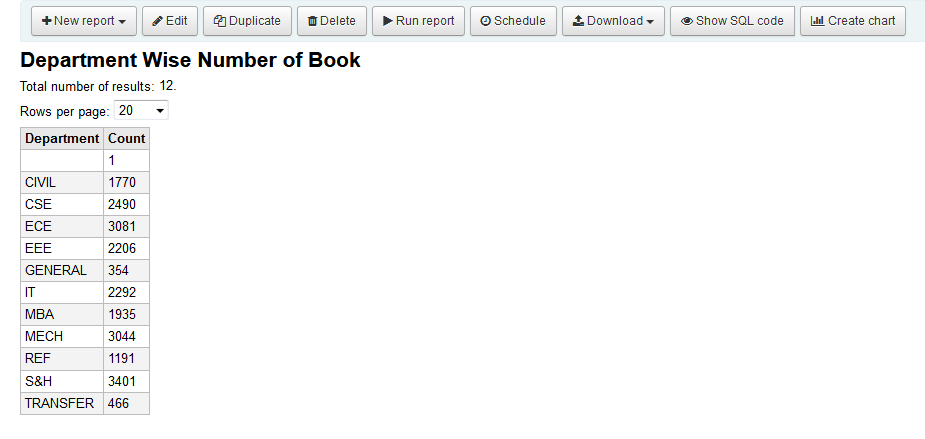
<td style="height: 18px; width: 265px;"><strong><a href="/cgi-bin/koha/reports/guided_reports.pl?reports=33&phase=Run%20this%20report"><span style="color: green;">Department Wise Number of Books</span></a><br /></strong></td>
</tr>
<tr style="height: 18px;">
<td style="height: 18px; width: 10px; text-align: center;"><strong>4</strong></td>
<td style="height: 18px; width: 265px;"><strong><a href="/cgi-bin/koha/reports/guided_reports.pl?reports=34&phase=Run%20this%20report"><span style="color: green;">Collection Wise Number of Books</span></a><br /></strong></td>
</tr>
<tr style="height: 18px;">
<td style="height: 18px; width: 10px; text-align: center;"><strong>5</strong></td>
<td style="height: 18px; width: 265px;"><strong><a href="/cgi-bin/koha/reports/guided_reports.pl?reports=15&phase=Run%20this%20report" rel="noopener"><span style="color: green;">Item Type Wise Number of Books</span></a><br /></strong></td>
</tr>
</tbody>
</table>
</div>
<div style="text-align: justify;"><br />
<table border="0" cellspacing="1" cellpadding="1" style="border-collapse: collapse; width: 279px; height: 110px; margin-left: auto; margin-right: auto;">
<tbody>
<tr style="height: 18px;">
<td style="height: 18px; width: 275px; text-align: center;" colspan="2">
<h3>?? Circulation Report</h3>
</td>
</tr>
<tr style="height: 18px;">
<td style="height: 18px; width: 9.03125px; text-align: center;"><strong>1</strong></td>
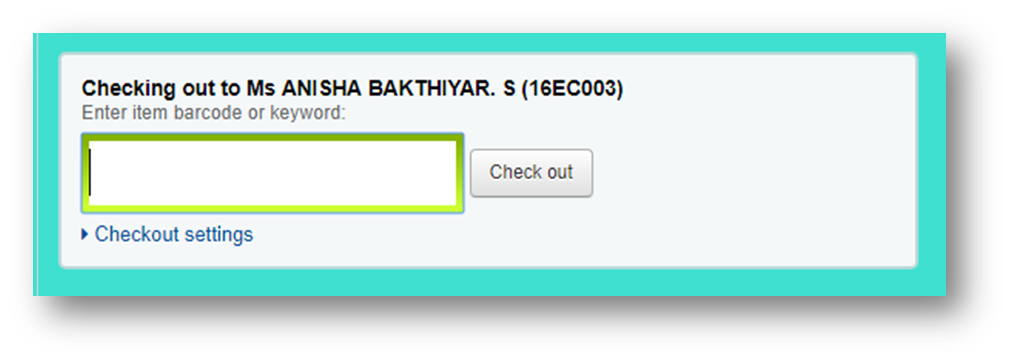
<td style="height: 18px; width: 262.969px;"><strong style="text-align: center;"><a title="Check Out List of Books (Date wise)" href="/cgi-bin/koha/reports/guided_reports.pl?reports=13&phase=Run%20this%20report" rel="noopener"><span style="color: green;">Check Out List of Books (Date wise)</span></a></strong></td>
</tr>
<tr style="height: 18px;">
<td style="height: 18px; width: 9.03125px; text-align: center;"><strong>2</strong></td>
<td style="height: 18px; width: 262.969px;">
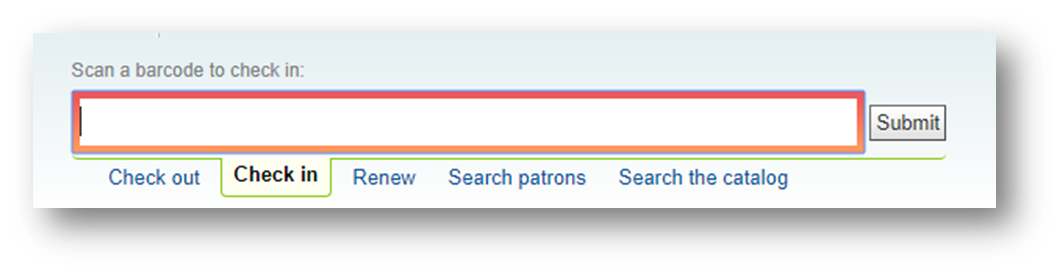
<strong style="text-align: center;"><a href="/cgi-bin/koha/reports/guided_reports.pl?reports=7&phase=Run%20this%20report" rel="noopener"><span style="color: green;">Check in List of Books (Date
</span></a></strong>
<strong style="text-align: center;"><a href="/cgi-bin/koha/reports/guided_reports.pl?reports=7&phase=Run%20this%20report" rel="noopener"><span style="color: green;"> wise)</span></a></strong>
<strong style="text-align: center;"><a href="/cgi-bin/koha/reports/guided_reports.pl?reports=7&phase=Run%20this%20report" rel="noopener"><span style="color: green;"></span></a></strong>
<strong style="text-align: center;"><a href="/cgi-bin/koha/reports/guided_reports.pl?reports=7&phase=Run%20this%20report" rel="noopener"><span style="color: green;"><br /></span></a></strong></td>
</tr>
<tr>
<td style="width: 9.03125px; text-align: center;"><strong>3</strong></td>
<td style="width: 262.969px;"><strong style="text-align: center;"><span style="color: green;"><strong style="text-align: center;"><a href="/cgi-bin/koha/reports/guided_reports.pl?reports=30&phase=Run%20this%20report" rel="noopener">Item Type Wise (Check Out Books)</a></strong><br /></span></strong></td>
</tr>
<tr style="height: 18px;">
<td style="height: 18px; width: 9.03125px; text-align: center;"><strong>4</strong></td>
<td style="height: 18px; width: 262.969px;"><span style="color: #e67e23;">
<strong style="text-align: center;"><a href="/cgi-bin/koha/reports/guided_reports.pl?reports=9&phase=Run%20this%20report" rel="noopener" style="color: #e67e23;">Overdues Book List</a></strong></span><strong><br /></strong></td>
</tr>
<tr style="height: 18px;">
<td style="height: 18px; width: 9.03125px; text-align: center;"><strong>5</strong></td>
<td style="height: 18px; width: 262.969px;"><strong style="text-align: center;"><a href="/cgi-bin/koha/reports/guided_reports.pl?reports=24&phase=Run%20this%20report" rel="noopener"><span style="color: green;">Circulation Daily Transaction</span></a></strong><strong><br /></strong></td>
</tr>
<tr style="height: 18px;">
<td style="height: 18px; width: 9.03125px; text-align: center;"><strong>6</strong></td>
<td style="height: 18px; width: 262.969px;"><strong style="text-align: center;"><a href="/cgi-bin/koha/reports/guided_reports.pl?reports=20&phase=Run%20this%20report" rel="noopener"><span style="color: green;">Month Wise Circulation Report</span></a></strong><strong><br /></strong></td>
</tr>
</tbody>
</table>
</div>
<div style="text-align: justify;"><br />
<table border="0" cellspacing="1" cellpadding="1" style="border-collapse: collapse; width: 280px; height: 25px; margin-left: auto; margin-right: auto;">
<tbody>
<tr style="height: 18px;">
<td style="height: 18px; width: 276px; text-align: center;" colspan="2">
<h3 style="text-align: center;">?? Accounts Report</h3>
</td>
</tr>
<tr style="height: 18px;">
<td style="height: 18px; width: 13.7969px; text-align: center;"><strong>1</strong></td>
<td style="width: 259.203px; height: 18px;"><strong><a href="/cgi-bin/koha/reports/guided_reports.pl?reports=5&phase=Run%20this%20report" rel="noopener"><span style="color: green;">Paid Fine for Students</span></a></strong></td>
</tr>
<tr style="height: 18px;">
<td style="height: 18px; width: 13.7969px; text-align: center;"><strong>2</strong></td>
<td style="width: 259.203px; height: 18px;"><strong><a title="Writeoff Fine" href="/cgi-bin/koha/reports/guided_reports.pl?reports=14&phase=Run%20this%20report" rel="noopener"><span style="color: red;">Writeoff Fine for Students</span></a></strong></td>
</tr>
<tr style="height: 18px;">
<td style="height: 18px; width: 13.7969px; text-align: center;"><strong>3</strong></td>
<td style="width: 259.203px; height: 18px;"><strong><a title="A/C Type of Fine" href="/cgi-bin/koha/reports/guided_reports.pl?reports=16&phase=Run%20this%20report" rel="noopener"><span style="color: green;">A/C Type of Fine<br /></span></a></strong></td>
</tr>
<tr style="height: 18px;">
<td style="height: 18px; width: 13.7969px; text-align: center;"><strong>4</strong></td>
<td style="width: 259.203px; height: 18px;"><strong><a title="Fine Details" href="/cgi-bin/koha/reports/guided_reports.pl?reports=17&phase=Run%20this%20report" rel="noopener"><span style="color: green;">Fine Details<br /></span></a></strong></td>
</tr>
</tbody>
</table>
</div>
<div style="text-align: justify;"><br />
<table border="0" cellspacing="1" cellpadding="1" style="border-collapse: collapse; width: 280px; height: 25px; margin-left: auto; margin-right: auto;">
<tbody>
<tr style="height: 18px;">
<td style="height: 18px; width: 276px; text-align: center;" colspan="2">
<h3 style="text-align: center;">??‍??<strong> Library Membership Report</strong></h3>
</td>
</tr>
<tr style="height: 18px;">
<td style="height: 18px; width: 13.7969px; text-align: center;"><strong>1</strong></td>
<td style="width: 259.203px; height: 18px;"><strong> <a title="Membership Staff " href="/cgi-bin/koha/reports/guided_reports.pl?reports=11&phase=Run%20this%20report" rel="noopener"><span style="color: green;">Membership Staff & Students</span></a></strong></td>
</tr>
</tbody>
</table>
</div>
<div style="text-align: justify;"></div>


